Setting up a CSM or Arcamax Heading Hold Gyro
These instructions are not meant to replace those that came with your gyro. They are simply a quick reference of how to set up your gyro without pouring through four pages of detailed information...
Bench Setup
1. Adjust the pot on the gyro to it's mid-point.
2. Set the Gear travel to 50% in each direction.
3. Adjust your rudder travel to 100% in each direction.
4. Center your transmitter's rudder trim slider.
5. Correct any servo drift (in heading hold mode) with the transmitter's Rudder sub-trim.
Flight Setup
1. From a hover in Standard Mode, adjust any yawing tendencies with mechanical adjustments only on the helicopter.
2. Switch to Heading Hold mode and adjust for tail wagging using the Gear channel travel adjustments.
3. Adjust pirouette speed with the Rudder channel travel adjustments.
Another Method Similar to Above
From: Rick's Heli Site
(Telebee Gyro Setup)
This is a simple installation method that will work
with any helicopter radio system that has a gear channel and adjustable ATVs.
Feel free to experiment with the advanced features of your radio system, such as gyro
functions, dual rates etc. However, before you decide the gyro doesn't work, try this
setup. I would guess that well over 95% of the problems with this gyro can be traced to
incorrect setup and mechanical problems with the helicopter.
First, plug the rudder servo directly into the receiver rudder channel and check to see that it is moving the correct direction. A right command will normally pull the tail control wire toward the front of a model that has the main rotor turning clockwise as viewed from the top.
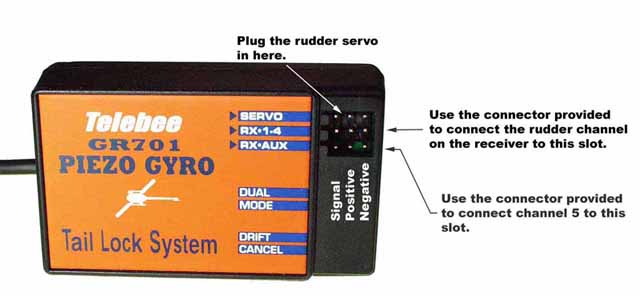
Study the pictures and make the connections as shown. You might have to use an extension on the rudder servo in order to reach the controller. I urge you to use channel 5 with all gyro functions inhibited for gain control. Once again, after you're satisfied that the gyro is working ok, then experiment with your gyro functions and other aux channels.
Remove the link from the rudder servo arm. Turn on the radio. At this time adjust the ATV on both sides of the rudder to 100% and the ATV on the aux channel to 60% on each side. Make sure you don't have anything else modifying the travel, such as AFR or dual rates. That's just for you guys with fancy radios. Move the rudder stick full left then hold the link over the servo arm and choose a hole that will allow full travel without binding. Check to make sure it doesn't bind to the right either. Ideally, you'll have the same travel both ways, although most models allow for more travel to the right. Adjust the position of the arm on the servo and the control rod length so you get full travel both ways without binding at 100% ATV.
In your transmitter, zero out any subtrim, tail rotor compensation, or any other tail rotor mixes. Check to see that the tail rotor pitch does not change in any flight mode, unless a tail rotor command is given. Do this by moving the cyclic and collective throughout their range, being careful not to move the rudder stick to the side. Turn the radio off.
Switch on the transmitter then the receiver. Be careful not to move the model. Watch the rudder servo. After a few seconds it will twitch. That means the gyro has initialized. Now move the rudder stick to one side and let go. If the arm returns to center and stops, you are in normal mode. If it drifts slowly to the other end of it's range, or stays put, it's in heading hold. If it's not in heading hold, put it in heading hold mode using the gear switch. If it drifts away from where you put it, use subtrim (or trim tabs, if you don't have subtrim) to stop the drift. When you're finished, the rudder servo should stay pretty much where you put it. In higher end radios that have trim rates, you should be able to get it very still.
Now check to make sure the gyro is operating in the right direction. On the bench, move the model so the nose swings to the left. The control rod should move forward, toward the front of the model. Once again this is assuming a clockwise rotation of the main rotors while looking at it from above. If not, switch the "reverse" switch on the gyro sensor.
Go ahead and lift the model into a hover and switch to heading hold mode. Do your final trim to keep the nose from turning. Turn the model into the wind and switch to normal mode. Careful here, the model will probably begin to yaw. Get some help if you aren't comfortable with nose in. Make a mental note of which way it turns. If it turns left, shorten the tail rotor control rod. Repeat if necessary. That's it. You're ready to fly...backwards, sideways or upside down...even straight ahead.
Fine tune the gain using ATV. In heading hold, the gain should be set as high as possible without wagging. Bump up the ATV on the aux channel until you notice a little wag, then back off a little.
Tips
The ATV on the aux channel controls gain. The ATV on the rudder channel controls how fast it will pirouette.
If the rudder seems too sensitive, put some exponential in on the rudder channel to tame it down around center.
A little drift is to be expected, especially during the first couple minutes of the flight. The more you fly the rudder, the less you'll notice any drift.
The best tape for mounting the sensor is CSM tape (CMLG150). The tape provided works okay Do not use wire ties or Velcro to secure the sensor. It will transmit vibration to the sensor. Also, be sure nothing is touching the sensor, including servo wires.
Mount the sensor on a steady platform. Any vibration will have a bad effect on the gyro's performance. If you use an exhaust diverter, cut it as short as possible. Mount your exhaust using a rigid mount. Make sure your boom supports are in good shape and there are no loose bolts on the machine.
Spend whatever time is necessary to get your control rod and slider operating freely. Keep your linkage in good shape. The links won't wear out as fast as the balls. When you notice play, fix it. If your control rod buzzes, find out why and make it stop. Buzzing rods will break in short order.
Use the longest, stiffest tail blades that you can safely fit on your model. Remember the tail rotor puts a big load on the engine, in upwind maneuvers especially. If engine speed/head speed disintegrates, so will tail rotor speed. When that happens, you can expect the tail to let go. Power is good.
Do your best to keep the headspeed constant. If during a descent, you notice the tail wagging, it's usually because the head is overspeeding, causing the tail to turn faster. Fine tune your throttle curve to prevent this.
Send me an e-mail if you like!
Similar pages: