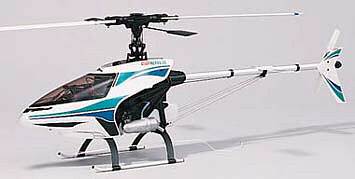
This is the Kyosho Nexus 30 with which I am learning to fly helicopters. What a BLAST!! I have flown R/C planes for 25 years off and on, but learning this thing is a whole new ballgame! It's kind of like juggling while standing on a basketball.
I've started a log of sorts for you to read. It outlines the successes, failures and excitement of learning to fly one of these beasts.
1/4 - How to get hooked on helis
I was out one Sunday afternoon flying my R/C plane, and one of the guys had a Nexus 30
helicopter there and was practicing hovering. He asked me if I wanted to give it a try,
and at first I said no, because I didn’t have a clue as to how to fly one. He kept
after me and finally I agreed to try it. It had training gear attached to make hovering
MUCH easier, and I actually hovered it for a few seconds! That was it…I just HAD to
get one!!
I ordered my ‘80% pre-built’ Nexus ($416) the next day and had it in my hands on Wednesday. Having considerable experience with R/C equipment, the radio installation was a breeze. In one evening, I had the radio installed and was ready to hover.
1/10 - Hover practice
This is where it all begins. I strapped on the training gear, which is four
3/8" dowel rods in a cross with golf ball whiffle balls attached to the ends. The
first hovers were not pretty. My stepson was learning at the same time – I’d
burn a half tank, then pass the transmitter to him to burn the last half. We practiced
several hours and got to the point where we could hover a few feet off the ground without
the heli hopping all over the place.
1/11 - Disaster Strikes!
On our second day of practice, we were still practicing hovers – this
time in a breeze. My stepson was flying and got a bit too high. The breeze got under the
rotor disk and picked the heli up just like it would do with a piece of cardboard held
into the wind. The chopper we up fairly quickly and pitched up. My stepson pulled the
power at about 20 feet, and the chopper came down like a rock!
1/11 - Crash evaluation
Upon examination, it appeared that the only damage was to the main rotors. I
got those ordered right away (two sets $75) and, at the same time, ordered an NHP heli
simulator for our PC ($185). Everyone on the Internet heli newsgroup suggested that anyone
starting on choppers should log at least 20 hours on the sim before attempting to fly the
real thing.
1/14 - Parts and simulator arrive
I put the new rotor blades on the machine and took it out for a
‘test’ hover to make sure everything was back to normal. It hovered fine, but I
noticed a wobble of the main mast when it was slowing down. Back in the shop, I noticed
that the main rotor mast was bent. I straightened the shaft but was still getting the
wobble. Ordered more parts (2 masts - $30). Time to fire up the simulator. Wow! This was a
real eye opener! I crashed the sim a BUNCH of times – thanking the people on the
newsgroup for recommending it and saving me a pile of dough in repair parts. The sim was a
bit touchier than the Nexus, but better that way than the other way around. If you can
hover the sim, you can hover the Nexus.
1/19 – Dial in the Main Mast
I just learned on the Internet Heli newsgroup (rec.models.rc.helicopter) that
my wobble problem mentioned above was not a bent mast (remember, I straightened it). The
problem is that the main shaft goes up through a collar with four set screws. The purpose
of these set screws is to align the mast! Learn something every day. I’ll still be
installing the new shaft when it arrives just to be safe.
1/22 – New parts arrived
After installing the new parts, I still had wobble. The feathering shaft was
also bent. This is the shaft that connects the main rotor blades through the head. The
flybar was also bent. I replaced the feathering shaft and straightened the flybar rod, and
went out to hover again. Still wobbled. Back to the newsgroup for questions. The
recommended checking the rotor speed – said to set it at between 1400 and 1500 RPM. I
bought a tachometer and checked it out. Sure enough, I was running about 1300. Changing
the pitch curve, I increased it to just over 1400 and back out to hover – NO WOBBLE!
1/24 – Forward Flight!
A helicopter flyer at the local field (Ray Zimmerman) showed up when I was
doing my normal tail-in hovering practice. I asked Ray to try some forward flight with my
Nexus and see how it felt. Well, you can probably imagine he made it look soooo easy. This
was all it took to get my nerve up enough to try some forward flight myself. After my
customary hovering, I ‘cut it loose’ and did some slow figure eight’s. It
went well, but my knees were really doing their shaking thing. It is quite easy to loose
perspective with a heli. That happened a couple of times but, remembering my simulator
training, I was able to regain control and get it back home.
1/25 – It won’t come down!
More forward flight – more figure eight’s. My next challenge was to
get the heli down after the forward flight. This sounds easier than it is! Here’s
what happened….when I pulled back the power as it was coming in, I had to reduce
power to the point that the rotor speed came down and the tail rotor started loosing
it’s effectiveness. This caused the chopper to yaw to the left. It turns out that I
still had my pitch curve set at 0, 6, 9. This is fine when learning to hover, but
dangerous in forward flight. It needed some negative to allow the heli to descend under
proper rotor speed. Lowering the low-end pitch to –2 fixed the problem.
2/1 – Don’t hover down to landing
Being used to hovering, I thought it made sense to hover down to landing after
forward flight. I was finding this difficult to do, and found out that it was due to the
heli coming down through it’s own rotor wash. The air under the main rotors is
chopped up and, when descending through it, makes the heli drop like a rock! Proper
approach to landing involves forward flight on a constantly descending glide path to
within a few inches of the ground, tail down a bit, then flair and settle down right on
the intended landing spot. Sound easy? Just TRY it!!
2/2 – First upgrade to the Nexus
The tail rotor was getting pretty sloppy, and examining it revealed a stripped
out pitch lever. While order that part, I ordered two bearings to replace the sloppy
bushings in the pitch slider housing. This should really help the ‘tail rotor with a
mind of it’s own’ problem. We’ll see….
2/7 – It worked!
Well, the tail rotor upgrade worked great. The
upgraded parts were all CNC machined aluminum with ball bearings. Zero tail rotor slop
now. As a result, the chopper has a more positive feel. Now I’m getting some erratic
tail whipping for no apparent reason. This comes and goes at will. Some other heli pilots
on the computer newsgroup think it is a heat-related metal-to-metal problem. GREAT! How to
find that one??
2/9 – Dust Problem
Parts are wearing out quicker than they should and it’s caused by dust. I
knew all along that it would take its toll, but I just wanted to burn fuel and fly!
It’s time now to get the dust thing under control. I first thought of spraying down
part of the flying field with water, but that seemed like a bit of a pain – having to
carry all that extra stuff. I’m going to try a 10x10 tarp nailed to the ground to see
if that will do the trick.
2/14 –
Another 'incident'
Well, the dust problem is solved. The tarp did the trick. Absolutely NO dust on the
chopper after about 20 landings! The incident occurred at about 20' of altitude in a
hover. All of a sudden (like most things in a heli), she started dropping like a rock.
Well, actually, a bit slower than that. Anyway, I gave it full collective...still nothing.
Hard 'landing' on the skids. No boom strike or any apparent damage. Inspecting the heli
revealed the problem - a ball link had come unsnapped in flight! This particular link is
one that connects up to the rotor blade. I had only one blade with collective working.
After replacing the ball link (and checking all others), I fueled it and wound her back up for a check flight. Something was wrong - a new clicking sound. Shut her down, pull the canopy and sure enough, the main gear was missing about 10 teeth! Still don't know how that happened as there was no boom strike and no visible signs of (but must have had) a tail strike. As long as it's torn down, I've ordered some ball bearing upgrades for the pitch slider bushing that is developing too much slop to suit me.
2/16 –
New radio
Just picked up a JR 8103 radio as my 622 was unable to give me the functions I was am now
looking for. Man, just like anything else...the more you get into it, the more it costs!
The 8103 is a fantastic radio for helis and planes. It has all the expo and
mixing functions a guy could ask for. I love it!
2/18 -- New Parts
The new parts worked great! At least, they went in great. Haven't had a chance to fly it
since they were installed, but the controls are much smoother and tighter.
2/21 -- Smooth sailing
The ball bearing parts made a big difference. The pitch slider now has zero slop and the
collective now has a more stable feel. I noticed a few ball links getting sloppy, so I
replaced them with steel balls just to be on the safe side. Forward flight is getting more
comfortable and I am getting better at my approaches to landing. I did a couple more
loops, but am still intimidated by rolls as my first one just didn't feel right. This is
the first time I flew the new JR 8103 radio and it was VERY smooth and VERY comfortable!
Loved it!
3/6 -- Carburetor problem
Today, the engine refused to idle. I traced the problem to a missing idle stop screw - you
know, the one that sets the idle (if you use this method instead of just using your
transmitter trim). Anyway, this screw worked it's way out, and let the whole throttle body
slide part way out! You Nexus owners (or OS 32 SFX owners) may want to check this out.
Forward flight is getting much more comfortable, and approaches to landing are sloooowly
getting better also.
3/7 -- Remote Glow Plug problem - solved
Am I the only person in the world that has been plagued by a remote glow plug problem?
Mine would make intermittent connection at the glow plug end. I finally got fed up with it
and chopped of the brass cap that fits over the plug and soldered an alligator clip to the wire. PROBLEM SOLVED! Ever try to fly a
Nexus in a 20 mph wind? Don't bother - I tried it today and couldn't even get it to turn -
it would just weathervane into the wind!
3/10 -- Plastic Balls Don't Get It!
The plastic balls that the ball links snap onto wear out pretty quickly. Here's what was
recommended to me and works great. Buy some stainless steel balls from your friendly heli
supplier. These have a small screw that goes through the center - there are some on the
Nexus already. Now, take your Dremel tool with a cutoff wheel in it and cut off the
plastic ball. Drill a hole (carefully) slightly smaller than the screw through the center
of where the ball was cut off. Screw the steel ball in place. Now you have a MUCH better
ball link with very little investment or work.
4/18 -- CRASH!
I hooked up a trainer cord so a buddy of mine could give hovering at 30' a try. After
recovering half a dozen times for him, I tried to recover from about 20' and became
disoriented, and my little Nexus dug a little hole in the ground. Not a bad crash, but
tore up blades, frame sides, feathering shaft, flybar shaft and mixing arms. Parts are
already on order and will have her back in the air this weekend.
I haven't been flying the Nexus much as most of my time and efforts have been going into the Ergo gasser....
5/2 -- Clutch Problem
All the parts arrived, so I assembled the Nexus and readied it for flight. It hovered
well, and forward flight was a pleasure after flying my heavy (and expensive!) gasser
around. The Nexus is so light and easy in comparison!
When trying to start it on it's third flight since rebuild, I couldn't get it to idle at all. Turns out that the clutch wouldn't disengage for some reason. Took it apart and found a broken allen head cap screw - the one that holds the shoe in place.
Later that day, I fixed the clutch and fired it back up. Clutch was dragging this time. Back apart. Found that the shoe was sprung out a bit too much, so I bent it back to where it was supposed to be. Fired it up and, as soon as I let go of the rotor, all of a sudden, the throttle started to advance ALL ON IT'S OWN!!!! It wound up to just under hover RPM. Yes, the transmitter was on! I still don't know why, but I then switched the transmitter off thinking that might help (see what panic does?). That failing, I grabbed the tail (I know - stupid!) to try to keep it in one place while I had time to think of how to shut it down. I couldn't reach far enough forward (safely) to pinch off the fuel line, and about that time, the swash plate started to move to the left - so did the rotor head (remember, the transmitter is off and out of reach at this time). At this point, I let go of the tail and ran like a scalded ape! Needless to say it thrashed itself right there in front of me! Guess what caused it - I forgot to snap on the ball link to the throttle...
Damage: ruined the main rotor blades and tail rotor blades.
5/5 -- Paint the Canopy
I decided to fix the problem that all Nexus owners have, which is how to keep the decals
on. The reason that the decals don't stick very well is that the polypropylene surface is
rough - preventing proper adhesion. The decals are only making maybe 10% contact with the
canopy. Here's how to do it the right way....
1) Rough up the canopy with 80 grit paper.
2) Prime with Flexible Bumper Primer available at auto paint stores.
3) Sand with 220 grit wet.
4) Prime with regular gray auto primer.
5) Sand with 320 grit wet.
6) Spray on a coat of fuel-proof white paint.
7) Apply new trim.
Optional: You can apply a coat of clear polyurethane over everything. This adds a little weight, but provides a better seal from fuel, etc. If you decide to do this, rub some #0000 steel wool over the paint and trim first to give it a 'tooth' for the polyurethane to adhere to.
NOTE: You'll probably want to repeat the priming/sanding steps to get a glass smooth finish.
5/17 -- Broken Muffler
When coming in for a landing today, I noticed the muffler was at a different angle than
usual. Hmmm, better tighten it. Well, it wouldn't tighten - bolt just kept right on
turning. It just so happened that the 'ear' was broken off where the nut rides on it. New
muffler on order - $30.
8/25 -- It's FOR SALE!
Yep, I'm putting my Nexus up for sale. I'll be upgrading to a GPH-346.
The Nexus comes with a JR XF-622 computer radio, Arcamax heading-hold gyro and the
complete helicopter in perfect flying condition - ready to roll, all for $600.
9/15 -- Sold It
Just sold my trusty trainer - hope it serves the new owner well.
Helo, 30/04:
Very helpful information about helicopters!
Ronny, 11/07:
I have a nexus 30 and looking for replacment parts can any one help.thank you
captain biggles, 26/07:
Hi just read your flight log.great stuff ok need some help here setting my nexus 30 up i.e transmitter settings i have a futaba T6EXHP FUTABA 7 channel reciever can anyone out there help me with the settings for this i just want to get the thing in the air so need basic settings(no 3D im in the uk so my transmitter is mode 2 any help much appreciated:o.
Moe, 11/07:
Yeup the good Ole Nexus 30 Mine is up for sale now I think I will stick with the off road vehicles I spent money on that nexus One time I had it 60 in the air I was trying to bring it back down to land it there was a severe down draft Well We all know what happened Some how it survived the crash with a broken muffler and main rotor blades.
Quinn Heiner, 06/04:
did you ever find parts for you nexus 30 if you did please let me know where thanks
Bernard de eon, 24/11:
i have no comments in Fact i am so glad to have read this coz i just bought the whole new package including radio gyro engine everything except of the muffler even the seller didnt know why it didn't came with it im expecting it in few days i paid 380.00 30.00 s&h insurance i'd like to know where i can buy parts for my trainer nexus 30 im excited thx for your tips i still be asking question in fremont ca bayside rc club(my club this is my second heli my first is a helimax cp which i can never lift even a foot without buying new parts again they said this nexus 30 is a better triner thx again
Similar pages: